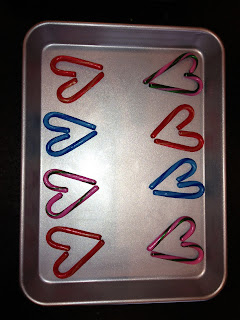
Yesterday I decided that I was desperately over due in spending a good day with the nephews. One of my favorite things to do with the boys is of course cooking or in all honesty having them help me decorate. A few weeks ago I found some mini candy canes on clearance at Target and knew what I wanted to do with them. Repurposing... making something old, new again. I liked the idea of taking two candy canes to make a heart. At first I was envisioning something much more simple and not quite as cute, something along the lines of dots of royal icing at the ends of each candy cane to make a simple heart. Then I discovered this gem from www.TheIdeaRoom.net and adapted the recipe.
How do you make them you ask? Here's what I did:
Take two mini candy canes of any color and flavor. I love the look of the red and white peppermint variety but wanted to go with something with a little more flavor and pizazz. Take the candy canes and arrange them in a heart shape on a non stick cookie sheet or lightly spray a regular cookie sheet. Slide the sucker stick in between them and make sure the stick doesn't go up much higher than where the heart connects at the top (see my picture for an example).
Put them in an oven that has been pre-heated to 350 degrees and literally sit there and watch them. It will happen fast, as in 3-4 minutes and if you are not watching they will actually melt flat (And yes, I know from experience :) Watch for the candy to start looking a bit melty and you will see little bubbles starting to form on the candy. This is when you know it is go time. Now, my cooking kryptonite is super hot splattering oil, and hot liquid candy that sticks to your skin. With that said, what you are supposed to do is pinch the ends of the candy canes together and around the front of the sucker stick. I did this for a bit but my wussy-ness got the best of me and I ended up using the ends of two sucker sticks to pinch the candy canes together. Also I liked using the half sized pan because I was able to keep up with the hot candy. If they do start to cool too fast and you can't pinch the candy canes together, pop them back in the oven for one minute, any longer then that and you will have yourself a big melty problem.
At this point set your cookie sheets to the side to cool. Once they are cool, lay out the suckers on wax paper and melt white chocolate chips in the microwave (I use the method of 30 seconds at a time on half power and stirring in-between), and pour a small spoonful into the middle of the suckers. Let the kids help decorate with a few sprinkles right on top. Let the chocolate set up for an hour or so before trying to pick up, package, or eat. These are sure to make for a great Valentines day for your family or a cute valentine for kids to give to their friends. Total hands on time, about 45 minutes to an hour & I made 30 suckers. Enjoy!
Showing posts with label Candy. Show all posts
Showing posts with label Candy. Show all posts
Wednesday, February 1, 2012
Saturday, January 28, 2012
GF Choco AmazeBalls (aka peanut butter crunch yum yum)
Yields: 2-3 dozen Amazeballs depending on how big you roll them.
Ingredients
2 cups Gluten Free Rice Krispies® (original Rice Krispies® are NOT gluten-free, so be sure to grab the right box)
2 cups creamy peanut butter
1 stick of butter, softened
1 pound of powdered sugar
Melting chocolate
Directions
1. In a large bowl, crush Rice Krispies (I use my Blentec, if you don't have a blendtec feel free to use a food processor, your clean hands or a wooden spoon).
2. Add peanut butter and softened butter to the bowl and mix thoroughly until the Rice Krispies are well mixed.
3.Begin adding powdered sugar to the mixture 1/4 pound at a time and stir well. Keep adding sugar until all of it is mixed into the Rice Krispies/peanut butter mixture.
4. Roll the mixture into small balls and refrigerate for 1-2 hours.
5. Heat the melting chocolate according to directions in a saucepan over low heat until all chocolate is melted.
6. Roll the peanut butter balls in the melted chocolate and place on wax paper to dry.
Subscribe to:
Posts (Atom)


