Sunday, March 4, 2012

Three Breakfast Cookie Recipes


Years and years ago one of my best friends was working her way through grad school. She worked for a company that made breakfast cookies. At first I thought the idea sounded ridiculous but then after trying an assortment of them and learning that they were not just sugar cookies that you eat for breakfast but flavorful, nutritious, high fiber, no added sugar, well balanced cookies, I was quickly sold. That was until I realized that they were not sold where I lived nor were they Gluten Free for the husband. 

Here are three recipes that appease the gluten free and normal people who fear gluten free as well. Try these babies, you will love them! They are delicious hot out of the oven, but wait you don't have time to make a fresh hot batch every morning? The good news is that they keep well. You can refrigerate them for a few days or wrap each one up individually and store in the freezer. These are also great to throw frozen into lunch bags and by the time it is lunch they are fresh and soft. They would also be a nice addition to your next brunch spread. Our family gets together a few times a year for brunch and while everything is delicious, sometimes you walk away feeling a little heavy and sugar filled. I'm hopeful that these will be accepted into our next Easter brunch :) 

Recipe : The Original Breakfast Cookie
1 1/2 cup gluten free rolled oats
1 cup coconut flakes
1/2 cup ground flax seeds (optional)
1/2 teaspoon salt
1 teaspoon cinnamon
1/4 teaspoon nutmeg
1/2 teaspoon allspice
1/3 cup of almond meal or flour (I use raw almonds bought in bulk and processed in my blendtec blender until it is a rough almond flour or meal. This will take a minute or two)
1/2 cup pecans
1 cup dried Craisins
1 large egg
3 ripe bananas, smashed
1/4 cup coconut or canola oil
2 teaspoon pure vanilla extract

Recipe : The Pumpkin Breakfast Cookie
1 1/2 cups gluten free rolled oats
1/2 cup ground flax seed (optional)
1/2 teaspoon salt
1 teaspoon cinnamon
1/4 teaspoon nutmeg
1/2 teaspoon pumpkin pie spice
1/3 cup of almond meal or flour (I use raw almonds bought in bulk and processed in my blendtec blender. This will take about a minute or two)
1/2 cup walnuts
1 large egg
1 ripe bananas, smashed 
1 cup of pumpkin puree
1/4 cup coconut oil
2 teaspoon pure vanilla extract


Recipe : The Peanut Butter Breakfast Cookie
1 1/2 cups gluten free rolled oats
1/2 cup ground flax seed
1/2 teaspoon salt
1 teaspoon cinnamon
1/2 teaspoon nutmeg
1/3 cup of almond meal or flour (I use raw almonds bought in bulk and processed in my blendtec blender. This will take about a minute or two)
1/4 cup natural chunky peanut butter (You can also make your own, my recipe here)
1 Tablespoon honey (optional)
1 large egg
3 ripe bananas, smashed
1/4 cup coconut oil
2 teaspoon pure vanilla extract


Mix all dry or semi dry ingredients together. In another bowl, or if you are lucky enough to have a Blendtec, add all wet ingredients and mix well. Note: if you are not yet comfortable with coconut oil, canola oil will work, or if you want to go extra healthy use applesauce. You can also make these with out the egg if you are trying to go dairy free. They cook up just fine and are a little more crumbly but I myself like the added protein. Combine the wet and dry ingredients. Then shape with a cookie scoop or spoon. Mixture will be loose so press the tops down slightly. Bake @350 degrees for 20 minutes. I always find that baking my cookies on parchment papers really does make a difference for the better but if you don't have parchment then just go without. Enjoy!

Wednesday, February 1, 2012

Adorable Valentines Suckers

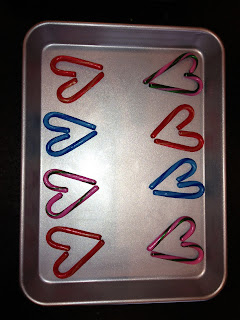
Yesterday I decided that I was desperately over due in spending a good day with the nephews. One of my favorite things to do with the boys is of course cooking or in all honesty having them help me decorate. A few weeks ago I found some mini candy canes on clearance at Target and knew what I wanted to do with them. Repurposing... making something old, new again. I liked the idea of taking two candy canes to make a heart. At first I was envisioning something much more simple and not quite as cute, something along the lines of dots of royal icing at the ends of each candy cane to make a simple heart. Then I discovered this gem from www.TheIdeaRoom.net and adapted the recipe.


How do you make them you ask? Here's what I did:
Take two mini candy canes of any color and flavor. I love the look of the red and white peppermint variety but wanted to go with something with a little more flavor and pizazz. Take the candy canes and arrange them in a heart shape on a non stick cookie sheet or lightly spray a regular cookie sheet. Slide the sucker stick in between them and make sure the stick doesn't go up much higher than where the heart connects at the top (see my picture for an example). 


Put them in an oven that has been pre-heated to 350 degrees and literally sit there and watch them. It will happen fast, as in 3-4 minutes and if you are not watching they will actually melt flat (And yes, I know from experience :) Watch for the candy to start looking a bit melty and you will see little bubbles starting to form on the candy. This is when you know it is go time.  Now, my cooking kryptonite is super hot splattering oil, and hot liquid candy that sticks to your skin. With that said, what you are supposed to do is pinch the ends of the candy canes together and around the front of the sucker stick. I did this for a bit but my wussy-ness got the best of me and I ended up using the ends of two sucker sticks to pinch the candy canes together. Also I liked using the half sized pan because I was able to keep up with the hot candy. If they do start to cool too fast and you can't pinch the candy canes together, pop them back in the oven for one minute, any longer then that and you will have yourself a big melty problem. 


At this point set your cookie sheets to the side to cool. Once they are cool, lay out the suckers on wax paper and melt white chocolate chips in the microwave (I use the method of 30 seconds at a time on half power and stirring in-between), and pour a small spoonful into the middle of the suckers. Let the kids help decorate with a few sprinkles right on top. Let the chocolate set up for an hour or so before trying to pick up, package, or eat. These are sure to make for a great Valentines day for your family or a cute valentine for kids to give to their friends. Total hands on time, about 45 minutes to an hour & I made 30 suckers. Enjoy! 


Saturday, January 28, 2012

GF Choco AmazeBalls (aka peanut butter crunch yum yum)


Based off an Udi's website recipe

Yields: 2-3 dozen Amazeballs depending on how big you roll them.

Ingredients

2 cups Gluten Free Rice Krispies® (original Rice Krispies® are NOT gluten-free, so be sure to grab the right box)
2 cups creamy peanut butter
1 stick of butter, softened
1 pound of powdered sugar
Melting chocolate

Directions

1. In a large bowl, crush Rice Krispies (I use my Blentec, if you don't have a blendtec feel free to use a food processor, your clean hands or a wooden spoon).

2. Add peanut butter and softened butter to the bowl and mix thoroughly until the Rice Krispies are well mixed.

3.Begin adding powdered sugar to the mixture 1/4 pound at a time and stir well. Keep adding sugar until all of it is mixed into the Rice Krispies/peanut butter mixture.

4. Roll the mixture into small balls and refrigerate for 1-2 hours.

5. Heat the melting chocolate according to directions in a saucepan over low heat until all chocolate is melted.

6. Roll the peanut butter balls in the melted chocolate and place on wax paper to dry.

Wednesday, January 25, 2012

Marsala Pears with Ricotta

We eat these classic Marsala Pears for desert after our big Italian Christmas dinner ever year. Except this year. Because we were in California and missed big Italian Christmas dinner, I decided I would share them with friends and family alike at my annual supper bowl party. These are a serious crowd pleaser so be ready for people to ask you to make them all year long.

  •  


    6 firm pears, preferably Bartlett; peeled, halved, cored (using amelon ball tool) and brushed w/ lemon juice
  • 3 c. water
  • 3 c. Sweet Marsala Wine
  • 1 1/2 c. sugar
  • 1/2/c. low-fat cream cheese
  • 1/2/c. low fat ricotta cheese
  • 3 Tb powder sugar
  • 1 oz semisweet chocolate, grated or curled
  • 4 Tb sliced almonds, toasted
  • Preheat oven 400 degrees F
  • Place pears in deep baking dish if possible (approximately 6 x 6 x 4 inches- If you don't have this then use a 9 x 13 Pyrex). In a medium saucepan, bring water, Marsala wine and sugar to a boil over high heat to dissolve sugar.
  • Pour boiling Marsala mixture over pears and bake in the oven uncovered for 1 hours (check for doneness, if it needs longer, let them cook). They are done when a knife easily pierces the pears.
  • Remove pears from oven and let rest in liquid for 30 minutes to cool slightly; then refrigerate at least 2 hours but overnight is preferred.
  • Beat cream cheese til light. Beat in ricotta and powder sugar mixing well. (You can also do this by combining everything in your Blendtec and hit the batter button as I did) Set aside. Remove pears from cooking liquid and set aside.
  • In a medium saucepan, set on medium high heat, reduce liquid to 1 1/2 cup (approximately 15-20 minutes...stir very often).
  • To serve, barely cut a flat spot on the bottom of the pears to make them sit flat. Place a chilled pear half in a bowl. Spoon 2 Tablespoons of the Ricotta mixture in the hollow of the pear. Drizzle with the Marsala syrup. Sprinkle with grated chocolate and almonds. Your taste buds will thank you for this one...


Thursday, December 22, 2011

Gluten Free Cheesecake Fantastico :)


First let me say that this is one of those recipes that you can serve and no one, I mean NO ONE will know that it is gluten free. It is ah-mazing.

Gluten Free Cheesecake with Nut Crust Supreme (Cheesecake filling recipe courtesy of  http://glutenguide.blogspot.com, the crust I adapted from Bette Hagman’s “The Gluten Free Gourmet Bakes Dessert”)

Preheat oven to 350 degrees

Gluten Free Nut Crust Supreme
2 cups Pamela’s Gluten Free Baking Mix (I was out of this so I used 2 cups of crushed gf cookies)
½ cup dark brown sugar
1/2 cup cold unsalted butter, cut into pieces
1 cup finely chopped pecans

Spray cheesecake pan lightly with olive oil spray or Pam. In a medium bowl stir together the flour mix and brown sugar. Cut in the butter until fine crumbs form. Stir in the nuts and pat into your pan. The crust will be “crumbly” but will hold together once pressed into the pan. This will be more than enough for one large cheesecake and perhaps for a second smaller pie. Though it tastes so good on it’s own you may just end up eating it!

Classic Gluten Free Cheesecake
4 – 8 oz bars of gluten free cream cheese, softened
1 cup of granulated sugar
2 eggs
¼ teaspoon salt
1 teaspoon gluten free vanilla

Mix all of the ingredients with a beater until smooth and pour into the unbaked crust. Place in preheated oven for 30 minutes.

While that is baking, prepare the topping.

2 cups gluten free sour cream
¾ cup granulated sugar
½ teaspoon of gluten free almond extract
Juice from ½ a lemon

Mix the topping ingredients in a bowl. After the first 30 minutes of baking, remove the cheesecake and spoon the topping onto the cheesecake. Be careful not to overfill the pan. Return the cheesecake to the oven and bake for an additional 10-20 minutes. You may want to place a piece of foil under the cheesecake just to catch any drippings. Cooking times can vary dramatically depending upon the amount of topping you choose to use. Watch to see when it starts to solidify but don’t let it stay in so long that the crust begins to burn.

This recipe is easy to make and incredibly scrumptious, I promise.


Thursday, December 1, 2011

Mushroom Stroganoff


INGREDIENTS

  • 1/2 pound button, portabello, cremini mushrooms, sliced (You can also use canned)
  • 3 Tbsp butter
  • 1/2 cup finely chopped onion
  • 3/4 lb leftover cooked turkey meat, dark or light meat, roughly chopped into bite sized pieces (Chicken or ground meat works too)
  • 1 cup leftover turkey gravy (or chicken or turkey stock) 
  • 1/8 teaspoon nutmeg
  • 1 teaspoon of paprika
  • 1 small squirt of dijon if you have any
  • 1 Tbsp of chopped fresh thyme or 1 teaspoon dry thyme (important, do not forget)
  • 1/2 tsp of black pepper
  • 1 tsp of salt
  • 1 cup of sour cream at room temperature (can substitute plain, greek yogurt)
  • 2 TBL of Worchestershire
  • Salt to taste (you will need more salt than you expect)
    • 1/2 lb gluten free noodles, cooked

METHOD

1 Heat a large sauté pan on medium-high heat for 1 minute. Add the mushrooms and dry sauté them (cook them without oil), shaking the pan frequently so they don't stick, for 3 to 5 minutes, until the mushrooms release their water and begin to brown.
2 Add the butter and onion and cook, stirring occasionally, for about 4 minutes, until the onions begin to brown. Sprinkle salt over everything. Add the turkey meat and gravy and stir to combine. Cook for a minute or two, and sprinkle on the spices.
3 Turn off the heat and add the sour cream and worcestershire. You may want to add a few tablespoons of water to thin the sauce. Mix in the sour cream thoroughly. Do not let the sauce come to a simmer or boil or it may curdle. Adjust seasonings to taste. In particular, depending on how salty your gravy was, you may need to add salt. More than you think.
Serve immediately over gluten free noodles.
Yield: Serves 4.

Wednesday, November 30, 2011

Crockpot Stuffing Gluten Free

One of the things my husband missed most when going Gluten Free was Stuffing on Thanksgiving. We've tweaked a lot of different recipes but think that this one is our best one yet!

1/2 cup of melted butter
1 cup diced onions
1 cup diced celery
1 can of 8 oz mushroom pieces
2 pkgs of Gluten Free Croutons
2 cups of Swanson Chicken Broth
Dry rubbed sage to taste (I like A---LOT, as in a whole regular size bottle)
1/2 tsp ground thyme
1/4 tsp garlic powder
1/2 tsp salt
1/2 pepper

Mix everything together in a crockpot and cover. Cook for 3-4 hours on low (first 45 minutes on high).

Yum! Happy Thanksgiving

-Amy

Thursday, November 24, 2011

Udi's Style Oven Stuffing


Udi's Gluten Free Stuffing Recipe


Ingredients
1 loaf of Udi’s Whole Grain Gluten Free Bread
1 loaf of Udi’s White Sandwich Gluten Free Bread
1/4 cup of fresh flat-leaf parsley
3 tablespoons of fresh sage (I used 3/4 of a bottle of dry rubbed)
Salt
Pepper
1 cup of unsalted butter
2 onions
1/2 cup of chopped celery
2 large eggs, lightly beaten
1 cup low sodium chicken broth
1/2 cup heavy crea
m
Methods/steps
Lightly butter each side of Udi's Gluten Free Whole Grain & White Sandwich breads.
Broil Udi's Gluten Free Whole Grain & White Sandwich Bread till slightly brown/toasted.

Allow bread to cool completely on a wire rack.

Put bread in a Ziploc bag and slightly break toasted bread into bread crumbs (or cut into pieces). Place in bowl with parsley, sage, salt and pepper.

Melt butter in a 12-inch heavy skillet over medium heat; add onions and celery saute until onions are softened.

Transfer vegetables to bowl with the toasted Udi’s gluten free bread crumbs. Add eggs, stock, cream and gently toss.

Transfer mixture to a buttered shallow baking dish. Bake, covered, in middle of oven for 30 minutes at 325 degrees. To brown the stuffing, uncover and bake for an additional 20 minutes.

Monday, November 21, 2011

Pao De Queijo ( Gluten Free Cheese Rolls )

 There are a few different ways to make Pao de Queijo and I prefer this one as long as you are not trying to make the dough ahead of time and freeze it. It is still possible with this recipe if you used powdered milk instead of liquid but it gets a little tricky. Anyways, we love this at our house and I know you will too .  This recipe was taken straight from Our Best Bites. Enjoys!
    It’s been tormenting my soul for the past 10 years as I’ve tried recipe after recipe trying to duplicate the taste and texture I love.  You can buy pre-packaged mixes, but they’re not quite the same as homemade.  The problem is that there are several different methods to making these little balls of heaven.  A lot of them involve lots of hard to find ingredients, and methods like heating a mixture on the stove, kneading a big messy dough, etc.  When I was in Brazil, I learned how to make the most quick and easy version- an ultra fast liquid batter that you just poured into a muffin tin.  It’s been driving me crazy that I couldn’t find my recipe or one that was like it.  And then a few weeks ago something magical happened.  My husband walked in after organizing some junk in the garage and asked me if I wanted a little pink notebook.  I knew immediately what it was. It was bursting with little scraps of papers.  Scraps of papers with recipe notes on them.  I heard the hallelujah chorus.  We ate Pao de Queijo about 25 minutes later.  And it was heavenly.
If you’ve never had this type of Brazilian cheese bread, it’s tricky to explain.  It’s actually not “bread” at all- at least not like we’re used to here in the US.  It’s almost more like the texture of a cream puff shell or popover, but with more substance on the inside. The outside is slightly crisp and browned and the inside is airy and chewy.  If you’re not familiar with them at all then I want you to be fully informed so you don’t expect an actual yeast bread “roll”.  If you do, then you’ll probably think these are super weird and gooey.  They’re served at popular Brazilian restaurants, but honestly, while I adore those restaurants, I’ve yet to have a really good Pao de Queijo at any of them.  So trust me when I tell you that if you like those (or any of the pre-packaged mixes), you will probably love these homemade ones.  And if you know anyone who has ties to Brazil like I do, you are sure to melt their heart with these.  Once you see how quick and easy they are you’ll be making them all the time!
The best part is that I have 99% of the ingredients in my house pretty much at all times.
The only semi-strange ingredient in there is Tapioca Flour, and it’s actually easier to find than you might think.  It’s a really smooth, soft flour that feels much like cornstarch.  It’s made from the ground roots of the cassava plant and it’s gluten free for those of you that care about that :)
A lot of normal grocery stores carry a good selection of Bobs Red Mill products which is the brand I use.  Here in Idaho I can always find them at Fred Meyer, near the health food/specialty foods isle.  You can also find tapioca flour at Asian markets as it’s used in a lot of Asian cooking, and also at health food stores and places like Whole Foods where you can find a good selection of wheat flour alternatives.  Definitely check the gluten free isle of well stocked store.  If you live in an area with WINCO grocery stores, people are telling me you can find it in the bulk section (how did not know this??  Thank you readers!) You can’t substitute any other type of flour- the tapioca flour is key, so when you find a good place to buy it, stock up!
Okay, ready for easy?  You can prep these in about 60 seconds.  Seriously.  Put everything but the cheese in the blender and blend until smooth.
Then add in your cheese and pulse the blender one or two times.  I like to break it up a bit and mix it in, but not pulverize it. And you can be creative here.  I like a mixture of Parmesan and sharp cheddar.  It’s important to use cheese that has a stronger flavor because it’s really  the only flavor you’re putting in there and if it’s too mild I’ve found the rolls turn out pretty bland.   But play around with it and find your perfect mix.  You can also add more or less cheese, it’s pretty flexible.
Now just take your blender and pour the batter into little mini-muffin tins.  It’s a very thin batter so pour slowly!
I like to sprinkle a little more parmesan on top.  Because I like to sprinkle a little parmesan on top of just about everything.  I inherited that from my father, who puts parmesan on just about everything he makes. A little sprinkle of kosher salt is also yummy.
Recently I was browsing food blogs and was excited to see a nearly identical recipe on Bewitching Kitchen.  She mentioned putting rosemary in there, which at first I thought sounded a little strange.  Not because I don’t think it would taste good, but because I’d never had pao de queijo with any type of herb before.  I tried it just for kicks and man was it good!  You can either sprinkle a little dried or fresh rosemary on top, or blend it right in the batter.  Loved that addition.
Then you pop these babies in a hot oven and watch them do their magic.  They puff up into perfectly little bubbly golden balls of cheesy goodness.  How’s that for a descriptive sentence?
You want to cook them just until they’re set on top and barely golden.  If you over cook them, the tops actually look pretty similar, but you can tell by the bottoms.  Case in point:
And don’t worry if the tops fall in, that happens sometimes- they still taste the same!
Eating Pao De Queijo warm is a definite must.   I’ll just say that right now.  As soon as they’re cool enough to handle, bust one open and eat it.
They’ll be a little crispy on the outside and soft, airy, and tender on the inside.  Almost a little chewy.  Some of them are even kind of hollow.  This version is definitely less dense than the kneaded dough variety.
I dare you to just eat one.  This recipe is a little dangerous.